GENERAL
As an Administrator, you can configure any number of SharePoint lists for synchronization. You can use an existing database or create a new database on the database server. The configuration tool will create two new tables in the database when the sync is configured. The first table will contain the most up-to-date information from the SharePoint list. The second will contain all Version History Data for any fields you mark for auditing.
When the list-to-database synchronization is first enabled, all data from the SharePoint list will be brought into the database tables, including all Version History for any columns that you marked for auditing. After the first run, the DataSync tool will incrementally update the database with only new and updated information from the list.
CONFIGURING THE DATASYNC TOOL
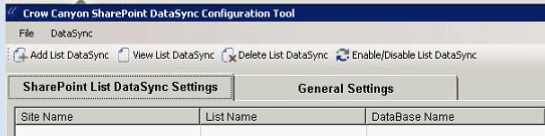
To configure the DataSync tool, open the Configuration tool from the Start menu. There are four options at the top:
Add List DataSync
View List DataSync
Delete List DataSync
Enable/Disable List DataSync
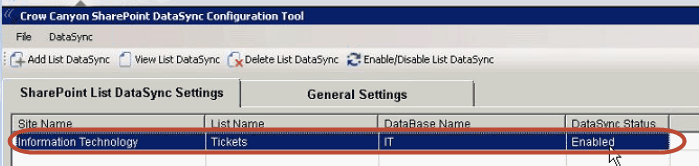
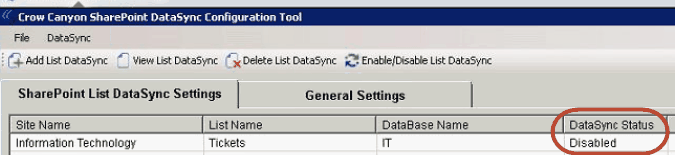
Below these options, there are two tabs: SharePoint List DataSync Settings and General Settings. SharePoint List DataSync Settings shows all existing list-to-database syncs and their status. The General Settings tab is where users can start/stop the sync service and perform other operations like setting logging related information and enter the license information.
ADD LIST DATASYNC
To create a connection, users must have an ODBC-compliant database available to accept the SharePoint list data.
On clicking Add List DataSync a dialog comes up that allows users to configure list-to-database connection.
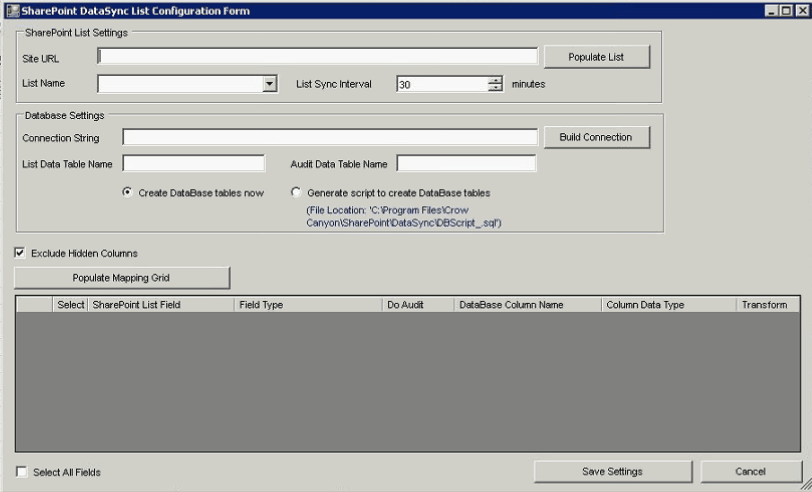
| 1. | Add the Site URL in the Site URL box. This is the SharePoint site that contains the list(s) you want to sync with the database |
| 2. | Click Populate List to capture all available lists and libraries in your the SharePoint site. |
| 3. | Choose which list or library you wish to sync from the drop-down list. |
| 4. | Define the List Sync Interval. You can define any number of minutes. |
| 5. | Click Build Connection. This brings up the box below, where you generate the required connection string. Enter the Database Server name and the Database Name. You can use either Windows Authentication or directly type the SQL Server Authentication User Name and Password. |
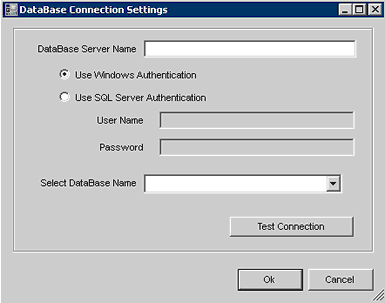
| 6. | The Test Connection button allows users to check if details provided are correct and if the connection to database can be established. |
| 7. | On pressing Ok, the connection string is generated and shown in Connection String box on the previous form. Note that connection string cannot be manually entered and must be generated using the “Build Connection” dialog box to ensure accuracy. |
| 8. | If the login being used has the correct permissions to create tables, select Create database tables now to automatically create the necessary tables in the database. Otherwise, the tool can generate the necessary scripts for the your Database Administrator(s) to create the tables. |

| 9. | Since SharePoint can have hidden columns, which are typically used for back-end workflows, the DataSync tool provides an option to Exclude Hidden Columns |
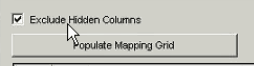
| 10. | Click Populate Mapping Grid. This will bring all of the lists columns into the grid in the display window. It should look similar like this: |

| 11. | Check off the Select box next to each column you want to bring into the database. |
| 12. | The Do Audit check box will bring over version history for that column. |
| a. | Note: It is recommended that the number of columns to audit is limited; having a large number of columns being audited can cause database performance issues. |
| 13. | The column names and types for the database are pre-populated with the best-practice column types. Users can choose to change the column type in the database -- for example increasing/decreasing the size of a text field based on user scenarios. |
| a. | Note: The tool can only consider standard SharePoint columns. If you intend to sync any custom columns (other than Crow Canyon custom columns), you’ll need to make sure the column type is mapped appropriately. |
| b. | Note: SharePoint field type is not editable as it reflects the column type of field on the SharePoint server and is displayed here for information purpose |
| 14. | The Transform option comes into play when referencing Lookup columns. By default, SharePoint Lookup columns add a string to the beginning of the item’s title (i.e. ID#;). The Transform option removes this initial string of text to return only the title name. |
| 15. | Once you have configured all of the options, click Save Settings. |
| 16. | On successful configuration, a confirmation dialog is shown for the new list-to-database connection |
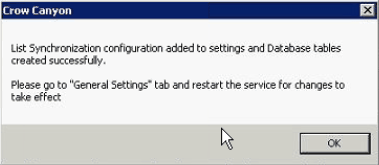
| 17. | As noted in the dialog box, you need to go to the General Settings tab to re-start the service. By Default, it is stopped whenever a new list-to-database connection is created. |
| 18. | The new connection will now appear in the list under SharePoint List DataSync Settings: |
VIEW LIST DATASYNC
The View List DataSync section shows all existing configurations for the particular list-to-database connection. The only editable option is the Connection String, which can be used in case the password for the database administrator account has changed. See Editing an Existing DataSync below for more information.
DELETE LIST DATASYNC
The Delete List DataSync option allows you to delete any of the existing list-to-database connections. Simply select which connection you wish to delete, and then click Delete List DataSync. Both edit and delete require service restart for changes to take effect.
ENABLE/DISABLE LIST DATASYNC
The Enable/Disable List DataSync button allows users to temporarily turn off one or more list-to-database connections. The SharePoint List DataSync Settings page shows whether a list-to-database connection is currently enabled.
Adding a new SharePoint field for export or selecting a new field for Audit requires re-creating the list-to-database sync. It cannot be done on an existing sync since the service cannot fetch the data for newly selected columns for the List Items that have already been exported to the database. Since the DataSync Tool has the ability to get data from the beginning and for all items in the list, adding new fields can be accomplished by creating a fresh list-to-database sync for the existing list with all the fields that are required for export and auditing. It is recommended that existing sync for the same list should be deleted once regular sync starts working for the newly setup created sync.
GENERAL SETTINGS TAB
There are three options under the General Settings tab:
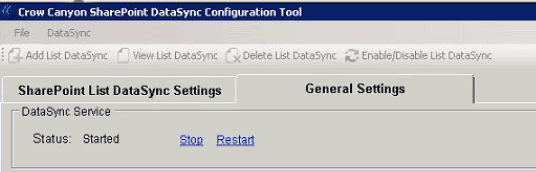
Start/Stop the DataSync service for all list-to-database syncs. This is required for any add/edit/delete of sync to take effect
Path to the folder for log files
Enter or Update the license for the DataSync tool
START/STOP SYNC SERVICE
Whenever a new list-to-database sync is added, it requires a restart of the DataSync service. At times, you may want to turn off the sync service temporarily. Stop or Start the DataSync service by simply clicking the Start, Stop, or Restart links under DataSync Service in the General Settings tab.
LOG SETTINGS
Log Settings allows users to define logging for the DataSync service.
Enabled sets whether logging occurs or not
Folder Path defines where the Log files are placed.
Level sets the degree of logging:
Error: This is the default mode; only critical information is logged.
Information: This outputs detailed log information and is useful in case service is not working as expected.The detailed logging helps the Crow Canyon Support Team analyze and fix the issues.

To change the logging level, choose either Information or Error in the drop-down list, and then click Save. Service needs to be restarted for changes to take effect.
UPDATE LICENSE INFORMATION
To add or update license information, refer to the License Registration section under General Settings. Users simply need to add or update the License Key in this section. The Status message tells whether the license is permanent or trial. Once you have added or updated your key, click “Register Key.”
